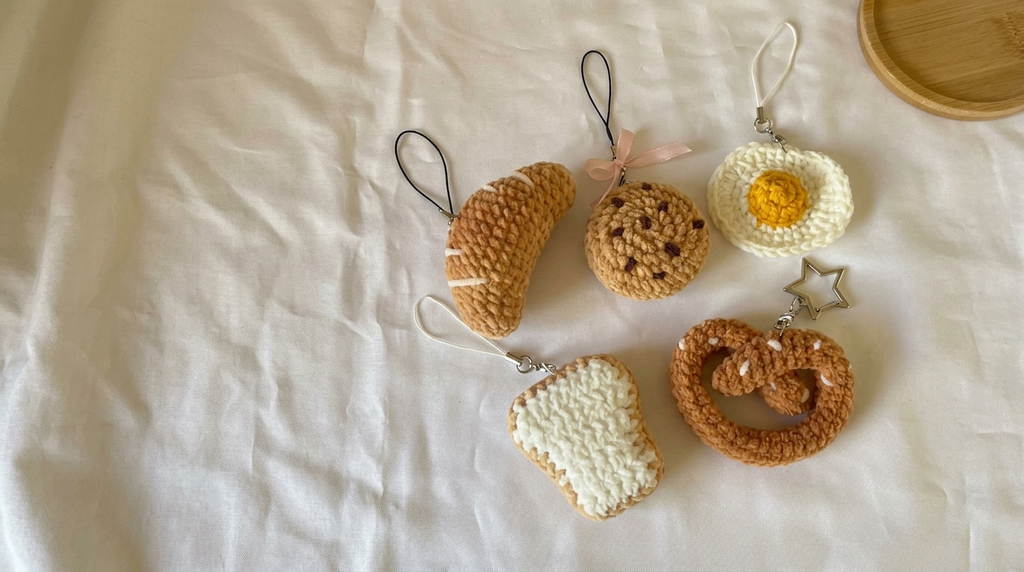
Crochet breakfast sets are one of those little projects that make me smile every time I pick up my hook. This cozy set of tiny treats works up as charming keychains or sweet handmade gifts for friends and family.
The Breakfast Set
This set brings together five little breakfast favorites: a croissant, a fried egg, a pretzel, a chocolate chip cookie, and a slice of toast. Each one is worked in simple stitches and finished with small details that make it look good enough to nibble.
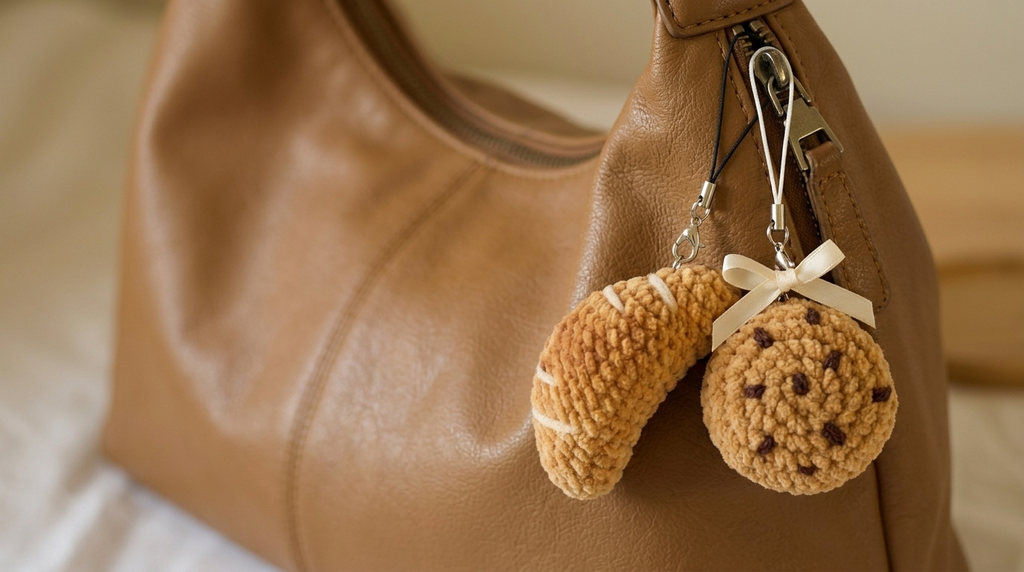
The croissant has a curvy, textured body, gently shaded with eyeshadow and finished with tiny embroidered stripes. The fried egg has a sunny yellow yolk in the center and a wavy white edge. The pretzel is a long brown tube bent into its classic shape and sprinkled with white embroidered “sugar.” The cookie is round and plump with embroidered chocolate chips, and the toast has a neat brown border like a real crust.
Brown, yellow, and white make a warm, bakery-fresh palette. Make the whole set for a breakfast-themed gift bundle, or pick your favorite and make just one.
Related Posts:
- Crochet Kitten with Headphones: A Cozy Little Listener
- Crochet Bubble Bag: A Chic and Timeless Accessory
- How to Crochet a Textured Lemon Peel Pouch
Materials and Tools
- Yellow yarn (egg yolk)
- White yarn (egg white, croissant stripes, pretzel sugar)
- Brown yarn (pretzel, toast border)
- Dark brown yarn (chocolate chips)
- Yarn for the croissant and cookie bodies
- Yarn for the toast
- Crochet hook
- Stitch markers
- Stuffing
- Darning needle
- Eyeshadow palette (a lighter and a darker tone)
Stitch by Stitch
- MR: magic ring, used to start the croissant, fried egg, pretzel, and cookie
- ch: chain, used for the start of rounds and rows, and for the toast foundation chain
- sl st: slip stitch, used to join rounds, to make the textured band on the croissant, and to join the toast border
- sc: single crochet, the main stitch in every piece
- inc: increase (two single crochet in the same stitch), used throughout
- dec: decrease; I work the invisible decrease through the front loops only (croissant, cookie, toast)
- hdc: half double crochet, used in round 6 of the fried egg
- hdc inc: half double crochet increase (two half double crochet in the same stitch), used in round 6 of the fried egg
- dc: double crochet, used in round 6 of the fried egg
- dc inc: double crochet increase (two double crochet in the same stitch), used in round 6 of the fried egg
- Front loop only (FLO): used for the croissant bands and decreases, the pretzel closing, and the cookie decreases
- Back loop only (BLO): used in round 4 of the fried egg
Construction
Croissant
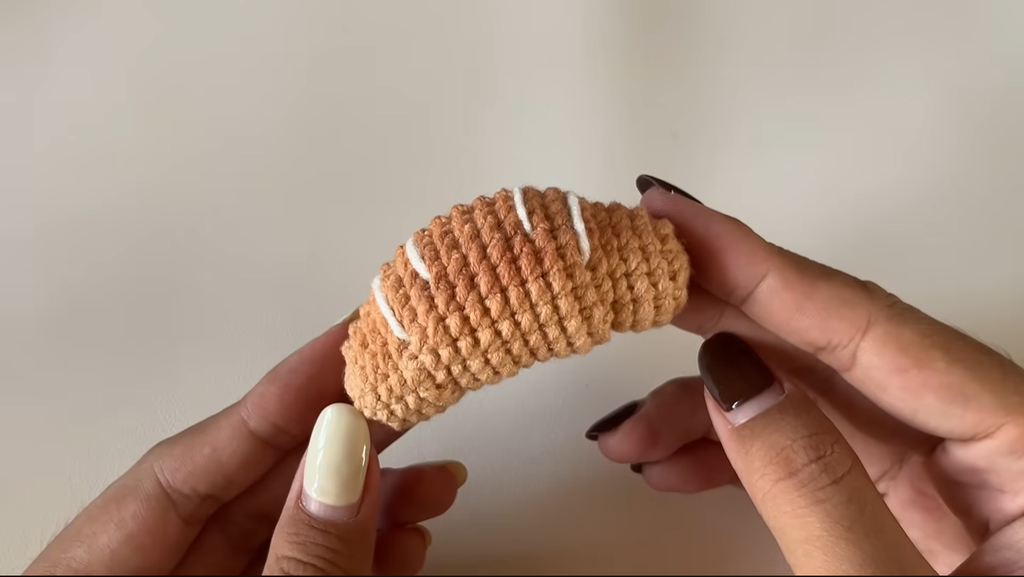
For the croissant, I start with a magic ring. At the end of every round I join with a slip stitch into the first single crochet, and I start every new round with chain 1. The chain 1 and the slip stitch are not counted in the stitch count.
Round 1: Make 7 sc into the MR. Pull the yarn tail tightly to close the ring, then sl st into the first sc to join.
Round 2: Ch 1. Work an increase in every stitch, 7 increases in total. You can mark the first stitch of this round with a stitch marker so you don’t lose count. Join with a sl st into the first stitch of the round, not into the chain-1 or the previous slip stitch.
Round 3: Ch 1. Sc in each stitch for 14 sc. Join with a sl st.
Rounds 4 and 5: Repeat round 3, working 1 sc in each stitch for 14 sc in each round.
Round 6: Ch 1. Make 4 increases, then 6 sl st (one in each of the next 6 stitches). Four stitches will be left, so work 1 increase in each of those 4 stitches. Join with a sl st into the first stitch.
Round 7: You can cut the end from the magic ring now. Ch 1. Make 1 sc in each of the 8 stitches of the 4 increases from the previous round, for 8 sc. When you reach the slip stitches, work 1 sc in the front loop only of each of the 6 slip stitches, for 6 sc. Then work 1 sc in each of the 4 increases from the previous round, for 8 more sc. Join with a sl st.
Round 8: Sc in each stitch for 22 sc.
Rounds 8 to 14: Sc in each stitch for 22 sc in each round, 7 rounds in total.
Round 15: Ch 1. Make 1 sc, then 6 sl st, then 8 sc until the end. Join with a sl st.
Round 16: Ch 1. Make 4 decreases, working each invisible decrease through the front loops only of two stitches. Then work 1 sc in the front loop only of each of the 6 slip stitches, for 6 sc. Make 4 more decreases. Join with a sl st.
Now start stuffing. I stuff more on the upper side to make it a little curvier and keep the bottom flat.
Rounds 17 to 19: Sc in each stitch for 14 sc in each round. Stuff a little more after round 19.
Round 20: Ch 1. Make 7 invisible decreases, working through the front loops only. Do not join. Cut the yarn, leaving a long tail, and stuff a little more before closing.
Closing: Thread the tail onto a darning needle. Go into the front loop of the slip stitch from behind, then into the front loop of the first decrease from behind, then into the front loop of the next stitch from behind. Continue through all the stitches this way. Pull the tail very tightly. Insert the needle back into the center and into the body, and pull tightly again. Go through a few other places in the body to secure the tail inside, then cut it.
Shaping and finishing: Squeeze the croissant gently to make it curvier, just like a real one. Using the eyeshadow palette, apply a little color at a time. Too much at once gets dirty and messy, so work slowly and thoroughly. I start with the lighter color, then use a darker tone, applying it throughout the body and especially on the upper part. When you are happy with the result, use white yarn to embroider tiny stripes on the body. Tie the two ends together, hide the knot inside, and cut the end.
Fried Egg
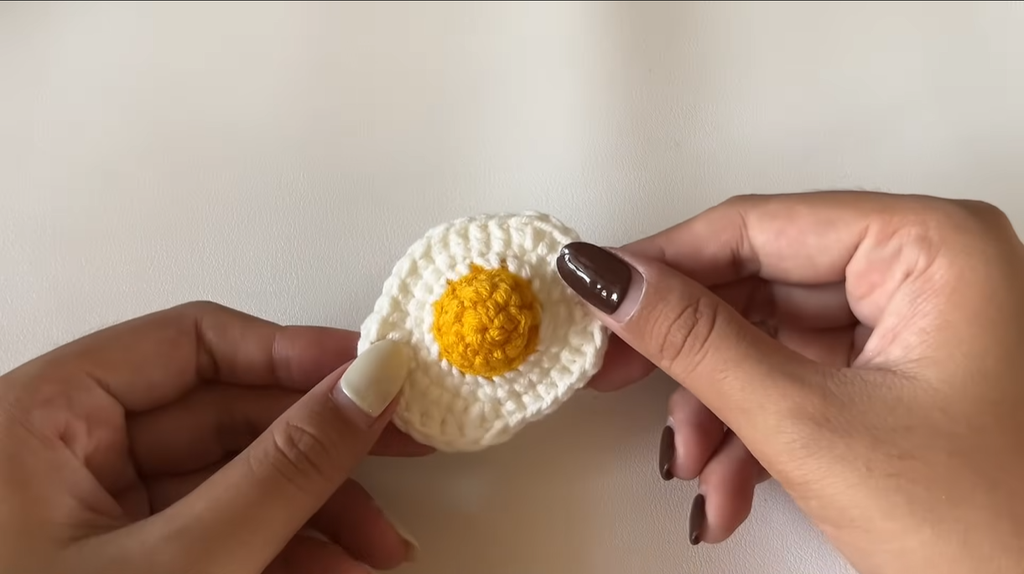
Start with the yellow yarn for the yolk.
Round 1: Make 6 sc into the MR. Pull the tail tightly, then sl st into the first stitch to join.
Round 2: Ch 1. Increase in all stitches, 6 increases in total. Join with a sl st into the first stitch.
Round 3: Ch 1. Sc in each stitch for 12 sc. On the last stitch, don’t finish it normally. Place the white yarn over the hook and pull it through the two loops on the hook to change color. With the white yarn, sl st into the first stitch.
Round 4: With white, ch 1. Working in the back loops only, increase in every stitch. As you go, bury the yarn tails under your stitches by laying them over your hook. You can carry the tails for 8 to 9 stitches and then continue to the end. Join with a sl st, then cut the yarn from the magic ring and the carried yarn.
Round 5: Ch 1. Sc in each stitch.
Round 6: Ch 1.
- Work 1 hdc in the first stitch.
- Work 1 hdc increase in the next stitch.
- Work 1 hdc in the next stitch, then 1 hdc increase in the next stitch.
- Work 1 sc in each of the next 8 stitches.
- Work 1 dc in the next stitch, then 1 dc increase in the next stitch. Repeat this for a total of 3 times.
- Work 1 sc in each of the next 4 stitches.
- Work 1 hdc in each of the next 2 stitches, then 1 hdc increase in the last stitch.
- Sl st into the first stitch to join.
Cut the yarn, leaving a long tail, and hide the tail.
Pretzel
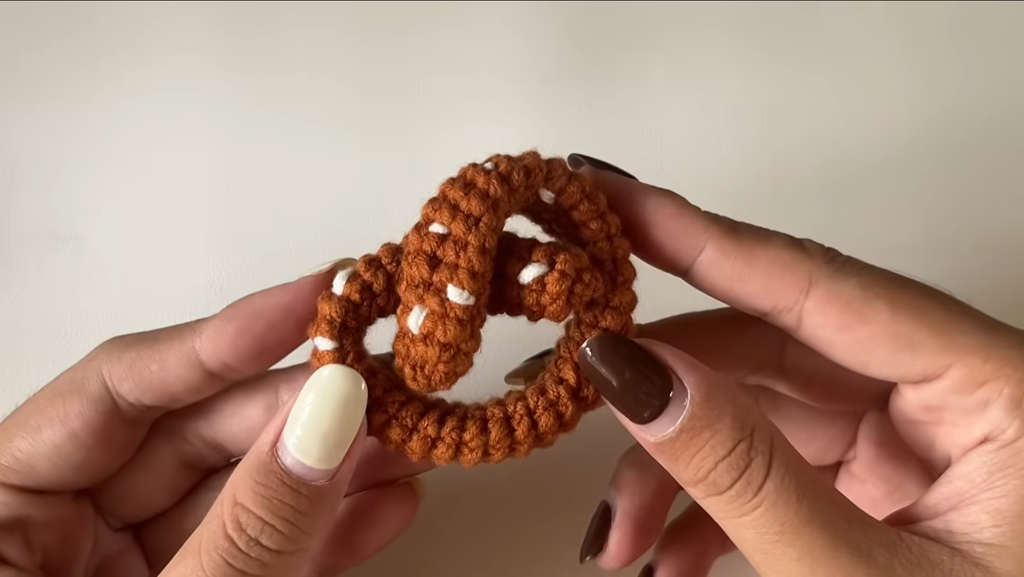
Use the brown yarn.
Round 1: Make 6 sc into the MR. Pull the tail tightly. This time, do not join with a slip stitch. Go straight into the next stitch. Mark the last stitch with a stitch marker.
Round 2: Work 1 sc in the first stitch, 1 sc in the next stitch, and 1 increase in the next stitch. Repeat once more: 1 sc, 1 sc, then 1 increase in the last stitch (the marked one). Flip your work so the right side faces you, and mark the last stitch with a stitch marker.
Round 3: Sc in each stitch.
Rounds 4 to 47: Sc in each stitch. That is 44 more rounds, ending at round 47.
Closing: Cut the yarn, leaving a long tail. Using a darning needle, close the remaining hole as for the croissant. Insert it into the front loop of the first stitch from behind, then the front loop of the next stitch from behind, for a total of 8 times. Pull the tail tightly, insert the needle back into the center and into the body, then tie it onto a stitch and secure the end.
Shaping: Cut a separate length of brown yarn about 8 in long. Bend the two ends of the tube and overlap them to make the pretzel shape. Sew the overlapping place with the brown yarn. You can use glue instead, but I recommend sewing because it looks neater and cleaner. Once you have the shape you want, bring the yarn tails to the same place, tie them together, and hide the knot inside.
Finishing: Use white yarn to embroider on the upper part for a sprinkled sugar effect.
Chocolate Chip Cookie

Round 1: Work sc into the MR. Pull the tail tightly to close the ring. Do not join with a slip stitch. Mark the last stitch with a stitch marker.
Round 2: Increase in all stitches, 8 increases in total.
Round 3: 1 sc, 1 increase. Repeat the sequence 8 times.
Round 4: 1 sc, 1 increase, 1 sc. Repeat the sequence 8 times.
Round 5: 3 sc, 1 increase. Repeat the sequence 8 times.
Round 6: Sc in each stitch for 40 sc.
Round 7: 3 sc, 1 decrease (front loops only). Repeat the sequence 8 times. Cut the yarn.
Base: Make a second piece by repeating rounds 1 to 4 of the cookie top. Cut the end, leaving a very long tail of about 14 in.
Assembly: Place the two pieces together with the right side of each piece facing toward you. Start sewing from any place you like. When you are almost finished, stuff the cookie lightly, continue sewing to close it, and hide the yarn tails inside.
Finishing: Use dark brown yarn to embroider the chocolate chips on the surface.
Toast

Start with a slip knot, then chain 7.
Row 1: Starting in the second chain from the hook, sc in that chain and in each chain across for 6 sc.
Row 2: Ch 1, turn. Sc in each stitch for 6 sc.
Rows 3 and 4: Sc in each stitch for 6 sc in each row.
Row 5: Ch 1, turn. Increase in the first stitch, 1 sc in each of the next 4 stitches, then increase in the last stitch.
Row 6: Sc in each stitch.
Row 7: Ch 1, turn. Increase in the first stitch, 6 sc, then increase in the last stitch.
Row 8: Increase in the first stitch, sc across the middle, then increase in the last stitch.
Row 9: Ch 1, turn. Decrease using the first two stitches, sc across the middle, then decrease using the last two stitches.
Row 10: Decrease using the first two stitches, 6 sc, then begin a decrease using the last two stitches. When you have 3 loops on the hook, place the brown yarn over the hook and pull it through all 3 loops to change color. Ch 1 with the brown yarn.
Border: Crochet around all four sides in the brown yarn, working in an anticlockwise direction and starting backwards to the left side. Bury the yarn tails under your stitches as you go.
- First side: insert your hook into the last row and work 1 sc into each row for 10 sc.
- Second side (the foundation chain side): work 1 sc into the lower side of each chain for 6 sc.
- Third side: 10 sc.
- Fourth side: 8 sc.
- Insert your hook into the very first stitch and make a slip stitch to join.
Cut the yarn, leaving a very long tail of about 14 in, and cut the buried yarn ends.
Second piece: Make another piece exactly like the first, but cut the yarn short when you finish.
Assembly: Place the two pieces together and sew them with the long tail, the same way as the cookie. When you are almost finished, stuff lightly, continue sewing until the end, and hide the yarn tails.
Wearing Your Breakfast Set
These tiny treats are made to be carried around. Turn any of them into a keychain, clip one to a bag zipper, or hang the whole set together for a cheerful bundle. They also make sweet gifts, and a full breakfast set tucked into a little box is a present I love to give. A croissant on a backpack or a toast on a keyring is a small way to brighten someone’s day.
Keeping Your Breakfast Set Fresh and Lovely
Keep your little treats clean and cozy by storing them somewhere dry, away from direct sunlight, which can fade the colors over time. If one gets dusty, gently brush it or spot clean it with a damp cloth rather than soaking it. Take extra care with the croissant, since its eyeshadow shading is delicate and can rub off or smudge with too much handling or moisture. If you carry your pieces as keychains, check the stitching and any sewn seams now and then, and tuck the yarn tails securely back inside if they work loose.
I would love for you to save this project to your Pinterest boards so you can come back to it whenever you want a quick, cute make. When you finish your own set, I would be so happy to see it, so please share your breakfast treats with us!
Follow us on Pinterest and subscribe to the Newsletter so you don’t miss a thing!
3 Comments